
Well, to date we have found an inexpensive vintage plane. We disassembled it, learned what the parts are, cleaned and de-rusted it, and made any necessary repairs. The next step to putting this plane back to work is to sharpen the iron/blade and fit the capiron. No matter how pretty your tool looks if it’s cutting edge is not sharp it will never work properly. Sharpening is the key to making any cutting tool work as it was designed to. Whenever you encounter a problem cutting with a tool the first thing you should do is to sharpen it.
If you have been around hand woodworking tools for any time you know that there are as many methods of sharpening as there are hand tool woodworkers. The key to an enjoyable hand tool experience is picking a sharpening method that best suits your budget and needs and sticking with it until you become proficient. The time wasted trying all the latest, greatest methods and equipment is better spent mastering the method you started with. Leave the atomic powered laser sharpener on the tool suppliers shelf, at least until you have mastered the system you began with. Then, and only then will you have the knowledge and experience to know what to look for in order to make your sharpening system even more efficient.
The first step in sharpening an old plane iron is grinding the bevel. I like to use a 6″ pedestal/bench grinder with a blue medium grit wheel. The 6″ wheel produces a slightly deeper hollow grind than an 8″ and because of the smaller circumference producing less surface feet per minute it runs cooler. The blue alumina zirconia abrasive also grinds cooler than other abrasive media.
I recommend a smooth, wide tool rest for best results. The tool rests that come with most grinders are useless for precision tool grinding. I made my own using flat ground mild steel. There are good commercial tool rests available if you would rather purchase them. Veritas has what appears to be a good one and Wolverine, made by Oneway also has a good one. I can highly recommend the Wolverine. I have been using one in my turning shop for several years and find it to be an excellent tool rest.
Set your grinder to grind a bevel angle of 25º. If you color the bevel with a black Sharpie it is easy to see where your wheel is grinding on your existing bevel. Using a protractor set to 25º you can see where you need to grind to produce the desired angle. You can find a short video on bevel grinding here. When grinding be careful not to blue any part of the cutting edge unless the blade is made from high speed steel. This will take the hardness out of that spot that is blued and this spot will not hold and edge.

I use diamond plates to flatten the back of the iron starting with the black/course plate.
Once you have the bevel ground to 25º you are ready for the next step which is to flatten the back of the iron. I use diamond lapping plates for this. Start with the black very course plate. This is about 220 grit.

Flattening the back of an iron.
The picture above shows the method I use. Holding the iron at a slight angle to the plate and keeping equal pressure across the cutting edge with your fingers while supporting the other end with your right hand move the iron back and forth along the length of the plate and move it in and out from about 5/8″ to 1 1/2″. This can be a very slow and tedious process, especially on an old iron that was never properly flattened. You will probably find at least one or both corners dubbed over. If the corners are too badly rounded over you may have to go back to the pedestal grinder to grind the bevel down to remove the rounded over corners. Keep the lapping plate wet with water. You can add a couple drops of Dawn dish detergent to the water. This acts as a lubricant and helps keep the swarf in suspension.
When the back appears flat across the entire cutting edge move on to the next grit which is blue. This time swing the angle you hold the iron to the plate in the opposite direction. This makes it easy to see when you have removed all the scratches from the previous grit plate. Work your way through the red and green plates each time swinging the angle to the plate in the opposite direction and being sure to remove all the scratches from the previous grit. When done with the 4 grits of diamond plates I move on to 4000 and 8000 grit water stones being sure to flatten each stone before use.

Finally! The back is flat and polished.
When you are finished the back of your iron should look like the photo above from corner to corner across the entire cutting edge. This is a tedious, time consuming job, but it only has to be done once.

The setup for lapping the micro bevel.
The photo above shows how I set the iron in the honing guide to lap the bevel. These digital protractors are accurate, repeatable, and inexpensive. I lap the bevel at 30º creating a micro bevel. The purpose of this is to reduce sharpening time. Some people create 2 micro bevels. One for the medium stone and one for the fine stone, but I haven’t found this method to save any more time so I hone on the 4000 grit stone and the 8000 grit stone at the same 30º setting.
When developing the micro bevel I also create a slight camber on the cutting edge. To do this place the cutting edge at the top of the 4000 grit stone. Place your left index finger on the left corner of the cutting edge. Place your right index finger on top of your left finger and while applying moderate pressure from both fingers draw the iron towards you for as complete a stroke as you can without letting the guide wheel drop off of the stone. Do 4 or 5 strokes this way. Then move both fingers to a point that is midway between the corner and the center of the iron and do 2 to 3 strokes with moderate pressure. Then move both fingers to the center of the cutting edge and do 2 strokes using moderate pressure. Repeat the previous 2 steps on the right side of the iron. You should now see a shiny surface at the cutting edge that is slightly wider at the corners than at the center. If not repeat the steps above until you have the desired micro bevel.
When you have a micro bevel that is wider at the corners tapering to narrower at the center you can take a couple of strokes to blend the camber. To do this place the cutting edge at the top of the stone and place your index fingers one at each corner of the cutting edge. While putting moderate pressure on the left corner of the iron and almost no pressure on the right corner begin to draw the iron towards you while at the same time decreasing pressure on the left corner and increasing pressure on the right corner until you have moderate pressure on the right corner and almost no pressure on the left. Then take another stroke doing just the opposite. Start with pressure on the right and gradually shift that pressure to the left. This step tends to fair the camber a little. Now you can repeat the above steps using an 8000 grit stone. After which your iron is ready for use. The purpose of this slight camber is to prevent plane tracks when planning surfaces that require multiple, overlapping strokes. Be sure to flatten your water stones prior to use.
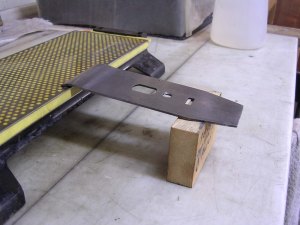
This is the setup I use to hone the mating face of the cap iron.

This photo shows the slight angle that ensures contact at the tip of the capiron.
Next the capiron must be fitted to the iron. This is the second but equally important reason for flattening the back of the iron. When the capiron is assembled to the iron there cannot be any gaps in the contact area. Even the slightest gap here will allow shavings to get stuck and choke the plane. There must be complete contact between the iron and capiron and that contact must be at the very outer edge of the capiron.
The photo above shows the setup I use to hone the mating edge of the capiron. The wood block supports the capiron in such a way that the mating face is slightly angled away from the very tip ensuring that contact with the iron will be at this very tip. While putting moderate and equal pressure on the capiron above the mating surface move it in and out in short strokes keeping it in contact with the plate and not bumping into the straight portion of the capiron. Do this until you have a flat surface from corner to corner. Repeat this for all 4 grits of diamond plates and you are done. I don’t use the water stones for this.
Now assemble the capiron to the iron with its edge less than 1/32″ back from the cutting edge of the iron and check your work.

Checking the fit of the capiron to the iron.
To check for a proper fit of the capiron to the iron hold the assembly up to a bright light. You should see absolutely no light coming through anywhere between the mating surfaces. If you do see any light the capiron needs more work. Color the mating surface of the capiron and go back to the extra fine diamond plate and take several more strokes. Check to see that all the black has been removed from the very outer edge of the mating surface. If not continue lapping until it has. Then check the fit to your iron again. Keep doing this until you get a perfect fit.
The final step in sharpening your plane is to prepare the outer surface of the capiron where it meets the iron. Most people hone this surface to 45º to the iron. This works well enough, but there is a better way. Take a look at this video.

This is the setup I use to hone an 80º angle on the face of the capiron.

Here you see a close-up of the wood block and how the capiron fits to it.
The photos above show the setup I use to hone the 80º face on the capiron. You can use any hardwood block that you may have. It must be thick enough to provide a good surface to contact the diamond plate. A thickness of at least 2″ and a width a little wider than your capiron is good. You can use a glue-up if need be.
Start at the top of the black diamond plate. Hold the capiron tightly to the wood block and with moderate downward pressure slide the capiron/block towards you. It shouldn’t take many strokes to get an 80º flat about 1/32″ or so wide. Repeat this process through all 4 grits of diamond and you are ready to assemble your iron and capiron.
As seen in the video the capiron must be assembled very tight to the cutting edge of the iron. This distance should be way less than 1/64″. Your iron/capiron assembly is now ready to go back to work. In the next part of this article I will show you how to setup your #5 to take fine shavings and a little on how to use it.
As always, thanks for stopping by and please feel free to leave a comment.


