
When fettleing a plane for the first time a lot of attention is usually paid to the iron, or blade, and rightfully so because no matter what else you do to a plane if the iron is not sharp the plane won’t function at it’s best.
The next most important part in the process is the cap iron, commonly known as the chip breaker. This part must fit the back of the iron perfectly with absolutely no gaps between it and the iron. The slightest gap between the back of the iron and the cap iron will catch a shaving eventually choking the plane mouth.The next operation on the cap iron is honing the face where it meets the back of the iron. Until recently I always honed this angle to 45 degrees, but I have learned differently, and in a moment I will share what I have learned.
When I first began using hand planes I experimented with mouth openings and cap iron settings. It is widely accepted that to avoid tear out we need a very tight mouth and I tried this. What I found was that if you have a tight mouth and a tightly set cap iron you will inevitably experience choking. So either the cap iron setting or the mouth opening had to be changed. After trying a tight mouth with a wide cap iron setting I tried a wide mouth with a tight set cap iron and that almost eliminated tear out. Then I was introduced to this video. If you haven’t already seen this video I advise you to watch it. This video confirmed what I had already learned. A tight mouth is not necessary for tear out free planing on all but the most difficult woods. The majority of our planing can be accomplished virtually tear out free using a sharp blade and a properly setup cap iron with an open mouth. No more adjusting the mouth every time you change the thickness of your shaving, which with a Bailey style plane can be time-consuming.

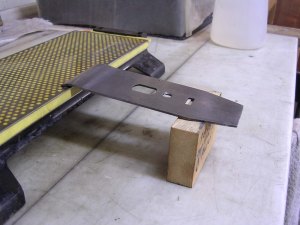
This is the method I use to hone the front face of the cap iron to 80 degrees. The steel block is only to hold up the block for the photograph.

A close shot showing the cap iron face on the honing plate.

Here you can see the clearance in the 80 degree block for the bend in the cap iron.
Now I’ll show you how I setup a cap iron for the first time in a Bailey style bench plane. This procedure assumes that you already have s freshly sharpened iron with a flat back. The first thing I do is establish the angle on the front side of the cap iron where it meets the back of the blade. As I told you earlier I used to hone this angle to 45 degrees, but after seeing the video I changed this angle to 80 degrees. After making this change tear out was minimized even more. The picture above shows the simple setup I use to hone this angle. An oak block cut to 80 degrees with clearance for the bend in the cap iron is used to present the cap iron to the diamond plate at the 80 degree angle. I hone both faces of the cap iron on diamond plates in four grits. Very coarse, course, fine and very fine. You don’t need a wide face on this angle, 0.045″ to 0.063″, or for the decimally challenged, 3/64″ to 1/16″, is sufficient.
This is the setup I use to hone the mating face of the cap iron.
Next I hone the face of the cap iron that meets the back of the blade. The picture above shows the method I use. A simple wood block cut to a height that allows the far end of the cap iron to be below the surface of the diamond plate. The object here is to hone a slight angle on the face of the cap iron to ensure that the tip that meets the 80 degree angle face is the only part in contact with the blade. As I said earlier any gaps here will catch shavings leading to choking. Hold one hand over the cap iron with three fingers pressing the face to be honed down on the honing plate and the other hand holding the wood block in place. Move the cap iron forward and back being careful not to come off of the plate and not to run the bend of the cap iron into the plate. While doing this slowly move the cap iron left and right being careful not to run off of the wood block.
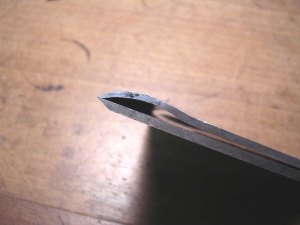
Look into this gap while holding the iron cap iron assembly up to a light. Do this from both sides. If you can see any light go back to the honing plate.
After the final honing on a very fine diamond plate assemble the cap iron to the blade with its edge close to the blades cutting edge. Then hold the assembly up to a light and peer through the bend in the cap iron to see if you can see any light showing between the cap iron and the blade. The picture above shows where to look. If no light can be seen your done, but if you see any light at all go back to the very fine diamond plate and hone some more until no light can be seen.

This shows how close the cap iron is set to the cutting edge of the blade. Actually it is a bit too far away in this picture. When set to 0.015″ to 0.010″as it should be it did not show in the picture.
The final operation is to set the cap iron. For general planing I usually take a shaving of 0.004″ or so for rough work where I want to remove material to 0.001″ for smoothing surfaces and removing mill marks. For this range of shavings I set the cap iron to less than 1/64″ from the cutting edge of the blade. This range of shaving thickness covers most of my planing needs therefore I rarely have to reset the cap iron to the cutting edge. This setup allows you to change the shaving thickness within a fairly wide range without changing the cap iron setting or adjusting the plane mouth and still plane surfaces without tear out.
As always thank you for stopping by and please feel free to leave a comment.

Reblogged this on She Works Wood and commented:
This is a post I really want to remember so I’ve reblogged it.
Great post and information. I stole it for my blog. I have to admit, I’ve looked for gaps between the blade and cap iron and fixed it if necessary. But I’m never worked on the front or top of the cap iron.
As I said I used to hone the front to 45 degrees, but now I use 80 degrees. This is not a pancea for all your planing ills. What it does for you is to allow for a pretty broad range of shaving adjustment without having to fiddle with the cap iron setting or the mouth opening. The result is more planing, less tear out, and less fiddling with plane adjustments. I never adjust the plane mouth anymore.
A well written post. I had always tried to keep the breaker close to the edge, but was surprised in how much performance I gained by honing a steep bevel on the breaker and moving even closer to the edge of the iron. It seems there is a sweet spot between the improved performance and the really crinkly shavings which don’t always leave the best surface. It seems that that sweet spot might vary with shaving thickness too.
Thank you for your information. It is good to know the results of others. After a little more experimentation you will find the combination that works best for the kind of work that you do. Then you can almost forget about mouth adjustments.
Thanks for your posts — I’ve just discovered your site, and it’s great! Do you have any thoughts about honing and setting breakers on cambered irons? I actually camber most of my irons except for my #7.
On a cambered iron the best you can do is set your cap iron/chip breaker as close as you can. The 80º cap iron setup is only needed on a smoothing plane where you are taking the finest of shavings. On a smoothing plane you really don’t want a camber, just back off the ends enough so as not to leave plane racks. Then you can set the chip breaker very tight. BTW. The #7 jointer, or any plane used for jointing should have a pretty good camber on the iron. This way you can adjust the surface flat when edge jointing a board for glue-up. Thanks for your comment.
Very useful thanks! I’ll try the 80°.